

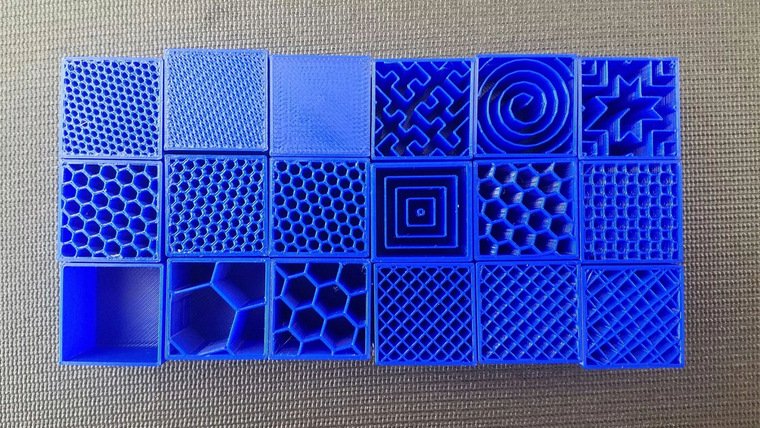
3D printer infill is the internal structure placed inside a 3D-printed object. Instead of printing a completely solid model, most FDM 3D printers create an outer shell and fill the interior with a selected pattern at a specific density.
Infill is an important part of 3D printing because it affects an object’s strength, weight, flexibility, printing time, and material consumption. Choosing the right infill settings can help you balance performance and efficiency for different types of projects.
What Is 3D Printer Infill?
Infill is the internal material structure between the outer walls of a 3D-printed model. It is usually generated automatically by slicing software after the user selects an infill pattern and density.
The outside of the object is formed by walls or perimeters, while infill supports the internal areas. Depending on the selected settings, the inside can contain a lightweight lattice, grid, lines, or another geometric pattern.
How Does 3D Printer Infill Work?
When a 3D model is prepared for printing, slicing software divides it into layers and determines how much material should be placed inside each layer. The software then creates the selected infill pattern according to the chosen density.
During printing, the nozzle deposits filament following that calculated path. The infill connects with the surrounding walls and contributes to the overall structure of the finished object.
What Is Infill Density?
Infill density describes how much of the internal area of a printed model is occupied by infill material. It is normally expressed as a percentage.
A lower percentage leaves more empty space inside the model, making the print lighter and generally faster to produce. A higher percentage creates a denser internal structure and can increase strength, weight, material consumption, and printing time.
Common Infill Density Levels
Very low infill settings are useful for decorative models and objects that do not need significant mechanical strength. They can reduce material usage and make prints faster.
Moderate infill is often suitable for general-purpose objects that need a balance between strength and efficiency. Higher infill levels can be useful for parts exposed to greater loads, although simply increasing infill is not always the best way to strengthen a component.
A completely solid print may be appropriate for certain applications, but it uses considerably more material and can take much longer to print.
Types of 3D Printer Infill Patterns
Modern slicing software provides numerous infill patterns. Each pattern distributes material differently and can influence the print’s mechanical behavior, appearance, and printing efficiency.
Grid Infill
Grid infill creates intersecting lines that form a regular grid inside the model. It is a straightforward pattern that provides support in multiple directions.
Grid patterns are commonly used for general-purpose prints where a simple balance between material usage and internal support is desired.
Lines Infill
Lines infill consists of parallel lines that typically change direction between layers. It is relatively simple and can be efficient for many everyday prints.
Because the nozzle follows comparatively straightforward paths, line-based infill can be useful when printing speed and simplicity are important.
Triangular Infill
Triangular infill uses connected triangular structures to create a strong internal framework. Triangular geometry can provide good resistance in multiple directions.
This pattern can be useful for functional parts where additional internal strength is required without making the object completely solid.
Honeycomb Infill
Honeycomb infill creates a pattern inspired by the hexagonal structures found in honeycombs. It provides an attractive internal geometry and can offer a useful combination of strength and material efficiency.
Although visually interesting, honeycomb patterns may not always be the fastest option. The best choice depends on the model and the slicer’s implementation.
Gyroid Infill
Gyroid infill is a three-dimensional continuous pattern with curved surfaces and interconnected paths. It has become popular for functional and visually interesting prints because it can provide balanced structural properties.
It can also produce distinctive patterns when viewed through transparent or partially open models. However, the appropriate density still depends on the intended application.
Cubic Infill
Cubic infill creates a three-dimensional repeating structure that can provide support in multiple directions. It is useful when an object needs a more distributed internal framework.
The pattern can provide a good compromise between material usage and structural performance for certain functional prints.
Concentric Infill
Concentric infill follows the shape of the outer perimeter, creating progressively smaller internal outlines. This can be useful for certain decorative objects and models where the internal pattern follows the geometry of the exterior.
Its usefulness depends heavily on the shape of the model and the desired mechanical properties.
How Infill Pattern Affects Strength
Infill contributes to the structural performance of a printed object, but it is not the only factor determining strength. Wall thickness, layer adhesion, print orientation, material, temperature, and the model’s geometry can all have major effects.
Increasing infill density can improve strength in some situations, but adding more walls may provide a more efficient improvement for certain parts. Therefore, the best approach is to consider the complete print configuration rather than focusing on infill alone.
How Infill Affects Weight
Infill density has a direct effect on how much material is inside a printed object. A model with low-density infill generally contains more empty space and therefore weighs less than a similar model with high-density infill.
Low-density prints can be useful when reducing weight is important. For example, lightweight models, decorative objects, and certain hobby components may not require a dense internal structure.
How Infill Affects Printing Time
Higher infill densities generally require the printer to deposit more material. This can increase the total printing time, especially for large objects.
Lower-density patterns can reduce the amount of internal material and may therefore shorten the print. However, actual printing time also depends on layer height, wall count, print speed, model geometry, and the selected pattern.
How Infill Affects Material Usage
Infill is one of the factors that determines how much filament a print consumes. Increasing density generally means using more material.
Choosing an appropriate density can therefore reduce unnecessary filament consumption. For many objects, printing at 100% infill provides little practical benefit compared with a carefully selected lower density combined with suitable walls.
Infill for Decorative Prints
Decorative objects usually do not require extremely high internal strength. Low or moderate infill can often provide sufficient support while keeping the model lightweight and reducing printing time.
The exact setting depends on the shape of the object. Some models may require additional internal support even when they are primarily decorative.
Infill for Functional Parts
Functional components often require greater structural reliability than decorative models. The appropriate infill depends on how the part will be loaded and where forces will be applied.
Instead of automatically choosing the highest possible density, consider increasing wall thickness, changing print orientation, selecting a stronger material, or using a more suitable infill pattern. These adjustments can sometimes produce a stronger part more efficiently.
Infill for Flexible Prints
Flexible objects require different considerations from rigid parts. A lower infill density can allow more movement and flexibility, while higher density can make the object more rigid.
Materials such as TPU are commonly used for flexible applications, but the final behavior depends on material properties, wall thickness, infill, print orientation, and other settings.
Infill for 3D Printed Models
For figures, prototypes, sculptures, and display models, infill is primarily used to provide internal support while keeping the object from becoming unnecessarily heavy.
Moderate or low-density settings are often sufficient for these applications. However, models with thin sections or large unsupported surfaces may require different settings to maintain stability.
Infill and Top Layers
Infill also helps support the upper surfaces of a printed model. If the internal structure is too sparse, the top layers may have difficulty bridging the space beneath them.
This can result in gaps, weak surfaces, or an uneven appearance. Appropriate top-layer thickness combined with suitable infill can improve the quality of horizontal surfaces.
Best Infill Pattern for 3D Printing
There is no universal best infill pattern for every project. A simple pattern can be ideal for a fast everyday print, while a three-dimensional pattern may be more appropriate for a functional component requiring multidirectional support.
The best choice depends on the model, material, required strength, printing time, and desired weight. Testing different patterns at similar densities can help determine which configuration works best for a particular application.
Infill vs. Walls
Infill and walls serve different structural purposes. Walls form the outer shell of the object, while infill supports the internal volume.
For many functional prints, increasing the number of walls can provide a more noticeable improvement in strength than dramatically increasing infill density. The optimal balance depends on the geometry and forces acting on the part.
How to Choose the Right Infill Settings
Start by identifying the purpose of the object. Decorative models usually need less internal material, while functional components may require more structural support.
Then consider the material, print orientation, wall thickness, desired weight, printing time, and expected loads. It is often better to test a few settings than to assume that the highest infill percentage will always produce the best result.
Tips for Better Infill
Use lower infill when the object does not need substantial internal strength, and increase it when additional structural support is genuinely necessary. Choose a pattern that matches the object’s intended use rather than selecting one solely because it looks interesting.
Also remember that infill is only one part of print optimization. Proper calibration, good layer adhesion, suitable wall thickness, and correct material settings can be equally important.
Final Thoughts
3D printer infill plays an important role in determining the weight, strength, material consumption, and printing time of an object. Different patterns, including grid, lines, triangles, honeycomb, gyroid, cubic, and concentric designs, provide different characteristics for different applications.
The ideal infill density and pattern depend on what you are printing and how the finished object will be used. By balancing infill with wall thickness, material choice, print orientation, and other slicer settings, you can produce efficient prints without using unnecessary filament.
